
NestJS Request Lifecycle Explained Step by Step

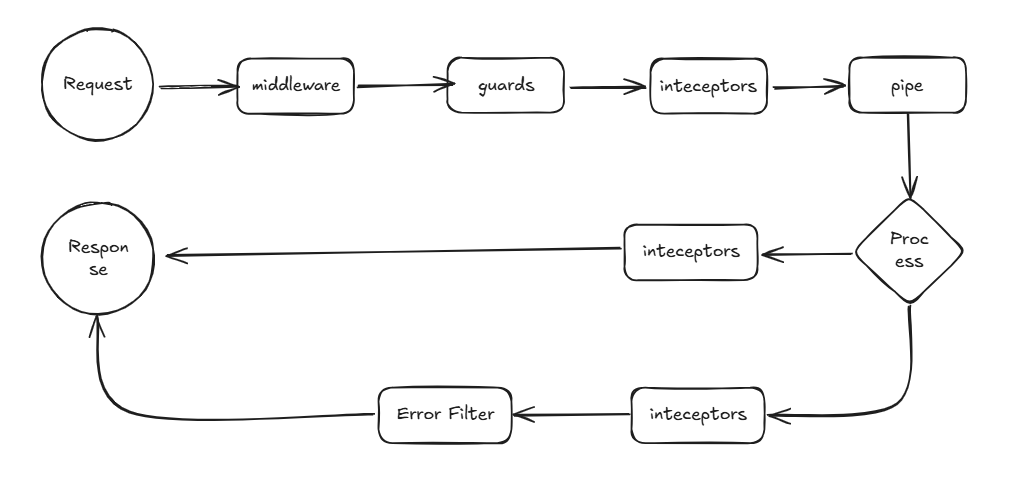
When a client sends a request to a NestJS application, the request does not go directly to the controller.
It first passes through several framework components. Each component has a specific responsibility, such as preparing the request, checking permissions, validating data, transforming responses, or handling errors.
Understanding the NestJS request lifecycle makes it much easier to:
- Organize application logic correctly
- Debug unexpected behavior
- Build secure APIs
- Validate incoming data
- Standardize API responses
- Handle errors consistently
In this guide, we will walk through the complete NestJS request lifecycle and explain when to use middleware, guards, interceptors, pipes, and exception filters.
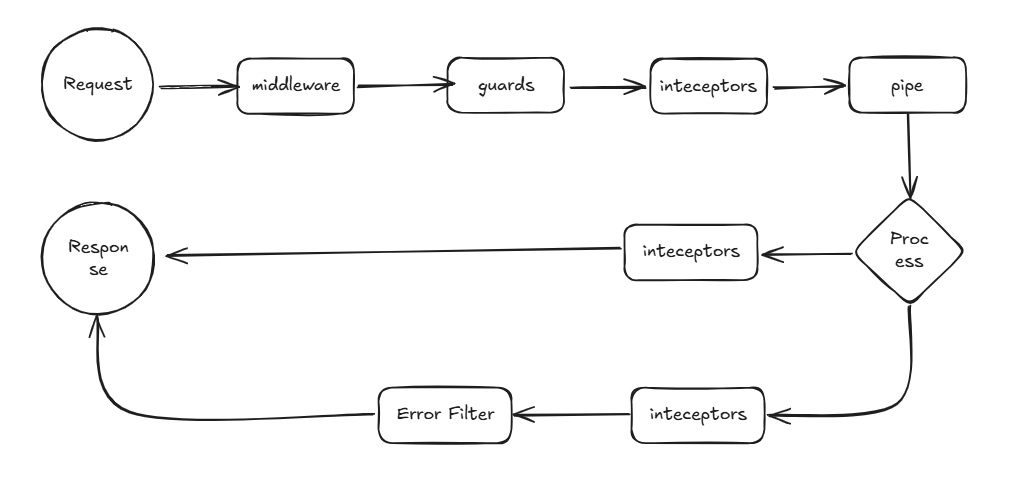
NestJS Request Lifecycle Overview
At a high level, a successful request moves through NestJS in the following order:
Incoming Request
    ↓
Middleware
    ↓
Guards
    ↓
Interceptors — before controller
    ↓
Pipes
    ↓
Controller
    ↓
Service
    ↓
Interceptors — after controller
    ↓
HTTP Response
When an uncaught error occurs, NestJS skips the remaining normal lifecycle and sends the error to an exception filter.
The official NestJS lifecycle order includes global, controller-level, and route-level components. Interceptors run in one order before the controller and reverse that order while processing the response.
1. Middleware: Prepare the Incoming Request
Middleware is one of the first components to process an incoming request.
It runs before guards, interceptors, pipes, and controller methods. Middleware can access the request object, response object, and the next() function that continues the request-response cycle.
A simple middleware function looks like this:
import { NextFunction, Request, Response } from 'express';

export function loggerMiddleware(
  request: Request,
  response: Response,
  next: NextFunction,
) {
  console.log(`${request.method} ${request.originalUrl}`);

  next();
}
The next() function is important. Without it, the request will not continue to the next component unless the middleware sends a response itself.
Common Middleware Use Cases
Middleware is useful for general request preprocessing, including:
- Logging incoming requests
- Generating correlation IDs
- Reading or normalizing headers
- Measuring request duration
- Adding information to the request object
- Parsing cookies or custom request data
- Applying basic request modifications
A helpful mental model is:
Prepare the request so the rest of the application can work with it.
Global and Module Middleware
NestJS runs globally registered middleware first, followed by middleware registered for specific modules or paths.
Global middleware can be registered in main.ts:
async function bootstrap() {
  const app = await NestFactory.create(AppModule);

  app.use(loggerMiddleware);

  await app.listen(3000);
}
Module middleware is configured through the NestModule interface:
import {
  MiddlewareConsumer,
  Module,
  NestModule,
} from '@nestjs/common';

@Module({})
export class AppModule implements NestModule {
  configure(consumer: MiddlewareConsumer) {
    consumer
      .apply(loggerMiddleware)
      .forRoutes('*');
  }
}
NestJS supports both functional middleware and class-based middleware that implements the NestMiddleware interface.
2. Guards: Decide Whether a Request Is Allowed
After middleware finishes, NestJS executes guards.
A guard determines whether a request should be allowed to reach a controller method.
While middleware prepares the request, guards make access-control decisions.
A guard answers this question:
Is this user allowed to perform this action?
Common Guard Use Cases
Guards are commonly used for:
- JWT authentication
- Role-based authorization
- Permission checks
- Resource ownership validation
- Feature access rules
- Multi-tenant authorization
- Subscription-level restrictions
A basic authentication guard may look like this:
import {
  CanActivate,
  ExecutionContext,
  Injectable,
} from '@nestjs/common';

@Injectable()
export class AuthGuard implements CanActivate {
  canActivate(context: ExecutionContext): boolean {
    const request = context.switchToHttp().getRequest();

    return Boolean(request.user);
  }
}
You can apply the guard to an entire controller:
import { Controller, UseGuards } from '@nestjs/common';

@UseGuards(AuthGuard)
@Controller('users')
export class UsersController {}
You can also apply it to a specific route:
@Get('profile')
@UseGuards(AuthGuard)
getProfile() {
  return {
    message: 'This is a protected route',
  };
}
Why Use Guards Instead of Middleware?
Middleware does not know which controller method will eventually handle the request.
Guards receive an ExecutionContext, which provides information about the controller, route handler, and related metadata. This makes guards a better choice for authorization decisions based on decorators such as @Roles() or custom permissions.
Guard Execution Order
Guards run in this order:
Global Guards
    ↓
Controller Guards
    ↓
Route Guards
If any guard returns false or throws an exception, the controller method will not execute.
3. Interceptors: Wrap Controller Execution
Interceptors wrap the execution of a controller method.
They can run logic before the controller executes and process the result after the controller finishes.
A useful mental model is:
Observe, transform, or enhance the controller execution.
The request flow looks like this:
Request
    ↓
Interceptor — before
    ↓
Controller
    ↓
Interceptor — after
    ↓
Response
Common Interceptor Use Cases
Interceptors work well for:
- Transforming API responses
- Measuring controller execution time
- Logging request results
- Caching responses
- Serializing response objects
- Removing private fields
- Mapping application errors
- Adding metadata to responses
Logging Interceptor Example
import {
  CallHandler,
  ExecutionContext,
  Injectable,
  NestInterceptor,
} from '@nestjs/common';
import { Observable } from 'rxjs';
import { tap } from 'rxjs/operators';

@Injectable()
export class LoggingInterceptor implements NestInterceptor {
  intercept(
    context: ExecutionContext,
    next: CallHandler,
  ): Observable<unknown> {
    const startedAt = Date.now();

    return next.handle().pipe(
      tap(() => {
        const duration = Date.now() - startedAt;

        console.log(`Request completed in ${duration}ms`);
      }),
    );
  }
}
The code before next.handle() runs before the controller.
The logic inside the RxJS pipeline runs after the controller returns its result.
Response Transformation Example
An interceptor can place every successful response inside a consistent structure:
import {
  CallHandler,
  ExecutionContext,
  Injectable,
  NestInterceptor,
} from '@nestjs/common';
import { map, Observable } from 'rxjs';

@Injectable()
export class ResponseInterceptor<T>
  implements NestInterceptor<T, ApiResponse<T>>
{
  intercept(
    context: ExecutionContext,
    next: CallHandler<T>,
  ): Observable<ApiResponse<T>> {
    const request = context.switchToHttp().getRequest();

    return next.handle().pipe(
      map((data) => ({
        success: true,
        data,
        meta: {
          path: request.url,
          timestamp: new Date().toISOString(),
        },
      })),
    );
  }
}

interface ApiResponse<T> {
  success: boolean;
  data: T;
  meta: {
    path: string;
    timestamp: string;
  };
}
The resulting response may look like this:
{
  "success": true,
  "data": {
    "id": 1,
    "name": "CodeBodia"
  },
  "meta": {
    "path": "/users/1",
    "timestamp": "2026-07-11T08:30:00.000Z"
  }
}
Interceptor Execution Order
Before the controller, interceptors run in this order:
Global Interceptor
    ↓
Controller Interceptor
    ↓
Route Interceptor
After the controller returns, they resolve in reverse order:
Route Interceptor
    ↓
Controller Interceptor
    ↓
Global Interceptor
This happens because NestJS interceptors wrap the request-response stream using RxJS Observables. An interceptor can also prevent the controller from running by returning its own Observable without calling next.handle().
4. Pipes: Validate and Transform Input
Pipes run shortly before the controller method is called.
They have two primary responsibilities:
- Validate incoming values
- Transform values into the required format
A good mental model is:
Is this input valid, and is it in the correct shape?
Common Pipe Use Cases
Pipes are commonly used for:
- DTO validation
- String-to-number conversion
- UUID validation
- Default values
- Input sanitization
- Rejecting invalid request payloads
Using ValidationPipe
Consider a DTO for creating a user:
import {
  IsEmail,
  IsString,
  MinLength,
} from 'class-validator';

export class CreateUserDto {
  @IsEmail()
  email: string;

  @IsString()
  @MinLength(8)
  password: string;
}
The controller receives the DTO:
@Post()
createUser(@Body() dto: CreateUserDto) {
  return this.usersService.create(dto);
}
Register the validation pipe globally in main.ts:
import { ValidationPipe } from '@nestjs/common';

async function bootstrap() {
  const app = await NestFactory.create(AppModule);

  app.useGlobalPipes(
    new ValidationPipe({
      whitelist: true,
      transform: true,
      forbidNonWhitelisted: true,
    }),
  );

  await app.listen(3000);
}
With this configuration:
whitelistremoves fields that are not included in the DTOtransformconverts values when possibleforbidNonWhitelistedrejects unexpected fields
When the payload is invalid, NestJS returns an error before the controller method is executed.
Using ParseIntPipe
Route parameters arrive as strings by default.
For example, the value of id in /users/42 initially arrives as "42".
You can convert it into a number with ParseIntPipe:
@Get(':id')
findOne(
  @Param('id', ParseIntPipe) id: number,
) {
  return this.usersService.findOne(id);
}
When the value is valid:
"42" → 42
When the value cannot be converted, NestJS returns a 400 Bad Request response.
Using ParseUUIDPipe
You can validate UUID route parameters in the same way:
@Get(':id')
findOne(
  @Param('id', ParseUUIDPipe) id: string,
) {
  return this.usersService.findOne(id);
}
This keeps validation logic outside the controller and ensures that the handler only receives valid input.
5. Controllers and Services: Execute Application Logic
Once the request passes through middleware, guards, interceptors, and pipes, NestJS calls the controller method.
The controller is responsible for handling the HTTP interaction:
@Controller('users')
export class UsersController {
  constructor(
    private readonly usersService: UsersService,
  ) {}

  @Get(':id')
  findOne(
    @Param('id', ParseIntPipe) id: number,
  ) {
    return this.usersService.findOne(id);
  }
}
The controller usually delegates business logic to a service:
@Injectable()
export class UsersService {
  findOne(id: number) {
    return {
      id,
      name: 'Sambath',
    };
  }
}
This separation helps keep controllers small and makes business logic easier to test and reuse.
A controller should mainly handle:
- Route definitions
- Request parameters
- Request bodies
- Response status codes
- Delegation to services
A service should normally handle:
- Business rules
- Database operations
- External API calls
- Reusable application logic
6. Exception Filters: Handle and Format Errors
Exception filters handle uncaught exceptions and control how errors are returned to the client.
NestJS already includes a built-in exception layer. For example, throwing a NotFoundException automatically creates an appropriate HTTP response:
throw new NotFoundException('User not found');
The response may look like this:
{
  "statusCode": 404,
  "message": "User not found",
  "error": "Not Found"
}
Custom exception filters are useful when your application requires a consistent error format.
Custom Exception Filter Example
import {
  ArgumentsHost,
  Catch,
  ExceptionFilter,
  HttpException,
} from '@nestjs/common';
import { Request, Response } from 'express';

@Catch(HttpException)
export class HttpExceptionFilter
  implements ExceptionFilter
{
  catch(
    exception: HttpException,
    host: ArgumentsHost,
  ) {
    const context = host.switchToHttp();
    const response = context.getResponse<Response>();
    const request = context.getRequest<Request>();
    const statusCode = exception.getStatus();

    response.status(statusCode).json({
      success: false,
      statusCode,
      path: request.url,
      timestamp: new Date().toISOString(),
      message: exception.message,
    });
  }
}
Register it globally:
async function bootstrap() {
  const app = await NestFactory.create(AppModule);

  app.useGlobalFilters(
    new HttpExceptionFilter(),
  );

  await app.listen(3000);
}
Now your API errors follow a consistent structure:
{
  "success": false,
  "statusCode": 404,
  "path": "/users/100",
  "timestamp": "2026-07-11T08:30:00.000Z",
  "message": "User not found"
}
Exception Filter Execution Order
Unlike guards, pipes, and inbound interceptors, exception filters begin at the most specific level:
Route Exception Filter
    ↓
Controller Exception Filter
    ↓
Global Exception Filter
Exception filters only run when an exception remains uncaught. Once a filter catches an exception, the same exception is not passed automatically to the next filter.
Middleware vs. Guards vs. Interceptors vs. Pipes
These components can seem similar at first, but each one has a different purpose.
| ComponentMain ResponsibilityTypical Use Case | ||
| Middleware | Prepare or modify the request | Logging, headers, correlation IDs |
| Guard | Allow or deny access | Authentication and authorization |
| Interceptor | Wrap and enhance execution | Response formatting, caching, timing |
| Pipe | Validate or transform input | DTO validation and type conversion |
| Exception Filter | Format uncaught errors | Standard API error responses |
A simple rule to remember is:
Middleware prepares.
Guards protect.
Interceptors wrap.
Pipes validate.
Controllers handle.
Services process.
Filters recover.
Complete NestJS Request Lifecycle Order
The detailed lifecycle for a successful request is:
1. Incoming request

2. Middleware
   ├── Global middleware
   └── Module middleware

3. Guards
   ├── Global guards
   ├── Controller guards
   └── Route guards

4. Interceptors — before controller
   ├── Global interceptors
   ├── Controller interceptors
   └── Route interceptors

5. Pipes
   ├── Global pipes
   ├── Controller pipes
   ├── Route pipes
   └── Route parameter pipes

6. Controller method

7. Service or business logic

8. Interceptors — after controller
   ├── Route interceptors
   ├── Controller interceptors
   └── Global interceptors

9. HTTP response
When an uncaught exception occurs, the remaining normal lifecycle is skipped and NestJS sends the exception to the appropriate exception filter.
Practical Example
Imagine a client sends the following request:
POST /users
Authorization: Bearer <token>
Content-Type: application/json
With this body:
{
  "email": "[email protected]",
  "password": "securePassword"
}
The request might move through your application like this:
- Middleware generates a correlation ID and logs the request.
- An authentication guard validates the access token.
- An interceptor records the request start time.
- A validation pipe validates the email and password.
- The controller receives the validated DTO.
- The service creates the user in the database.
- The interceptor transforms the returned user into a standard response.
- NestJS sends the response to the client.
If user creation throws an uncaught exception, an exception filter formats the error response.
Best Practices for the NestJS Request Lifecycle
Keep Middleware Generic
Middleware should handle general request-level tasks. Avoid placing route-specific authorization or business logic inside it.
Use Guards for Access Control
Authentication, permissions, roles, and ownership checks belong in guards because guards understand the current execution context.
Validate Data with DTOs and Pipes
Do not manually validate every field inside controllers. Use DTO classes and ValidationPipe to keep validation reusable and consistent.
Use Interceptors for Cross-Cutting Behavior
Interceptors are ideal when logic needs to run around controller execution, such as response transformation, caching, serialization, or performance monitoring.
Keep Controllers Small
Controllers should focus on receiving requests and delegating work. Business logic should normally live inside services.
Standardize Errors with Exception Filters
A consistent error structure makes your API easier to consume, document, monitor, and debug.
Final Thoughts
The NestJS request lifecycle becomes much easier to understand when every component has one clear responsibility:
- Middleware prepares the request.
- Guards decide whether access is allowed.
- Interceptors wrap execution and transform results.
- Pipes validate and transform incoming data.
- Controllers receive the request.
- Services execute business logic.
- Exception filters format uncaught errors.
Once you understand this order, you can place application logic in the right layer, reduce duplicated code, and build APIs that are easier to maintain.
The main flow to remember is:
Request
  → Middleware
  → Guards
  → Interceptors
  → Pipes
  → Controller
  → Service
  → Interceptors
  → Response
For errors:
Uncaught Exception
  → Exception Filter
  → Error Response
Mastering this lifecycle is an important step toward building clean, secure, and scalable NestJS applications.